Which LabSat should I use?
All LabSat models can be used for TTFF testing. The GNSS capabilities of the device under test (DUT) will determine which model is most suited.
If your DUT supports signals outside of the L1 frequency band, for example GPS L5, then LabSat 3 Wideband is the model required.
If your DUT only operates within the L1 frequency band, we recommend LabSat 3 for this test.
If your DUT requires a real time (current timestamp) RF signal, LabSat Real-Time or Real-Time+ would be the only suitable model.
Overview
What is Time to First Fix?
When a GNSS receiver is turned on, it searches for satellite signals and this process is called acquisition. Once it has acquired signals it tracks them to calculate its position, or fix. The time taken from switch on to a valid location fix is known as Time to First Fix or TTFF. In order to calculate a valid location fix, the GNSS receiver requires almanac data and ephemeris data in addition to the GNSS satellite signals.
Almanac Data
Almanac data contains coarse orbital and status information for all satellites within a constellation. Every satellite broadcasts the almanac data for the whole constellation so that a receiver can approximate the locations of all satellites and determine which it should track. By only focussing on those above the elevation mask, the receiver narrows its search and saves time on acquiring a position fix.
Ephemeris Data
Ephemeris data contains very precise data on the orbital path and position of each satellite, including clock correction data. This allows a receiver to accurately locate an individual satellite at any time. Each satellite only broadcasts its own ephemeris data.
When conducting TTFF testing, there are three conditions that should be tested: Cold Start, Warm Start and Hot Start. These simply refer to what data is available to the receiver when it is turned on.
- Cold Start – A cold start state usually occurs when a receiver is turned on for the first time, has intentionally undergone a factory reset or has been manually cold started. After a cold start, the receiver has no time, position, almanac or ephemeris data available to it and must therefore complete a full search of the sky for satellites.
- Warm Start – A warm start state usually occurs when a receiver has been switched off for a day or two or has moved up to 100km from its last know position. It will know the approximate time and position, and will have retained valid almanac data, stored from the last time it was on. However, it will not have any ephemeris data as this either was not stored or will be outdated.
- Hot start – A hot start state usually implies the receiver has been off for only a few hours. It will have retained its approximate time and position, and valid almanac and ephemeris data. In this condition, the receiver can quickly locate and track satellites that are overhead and Time to First Fix should only take a few seconds.
How to Test Time To First Fix?
When conducting your TTFF test there are a range of parameters that you should consider and select based on the technical capabilities of your product and its realistic, intended use by the end user.
The scenario that you record or create for your test should be based on a likely user case. Is your product intended to be used in a static or dynamic manner, is it likely to encounter multi-path or other inference? There is little point in using a static scenario set in an open field if your device will be used in an urban environment while moving.
It is advisable to complete the tests using a range of scenarios that represent different user cases. These might represent vast differences in environment on a global scale or they could represent micro-differences within a specific environment. By performing tests using a range of scenarios you will gain more accurate results on performance and prove robustness.
If your device can track multiple constellations or multiple frequencies, then this should be included in your testing. The testing of individual and combined constellations and signals should be completed across the scenarios already defined by type and range (see above). This will ensure that all are functioning within expected limits and that any issue with a particular constellation or signal is not being masked by operational ones.
It is important to test that your device performs adequately in all three starting states as poor performance in any state could lead to user dissatisfaction.
Test Process
Step 1)
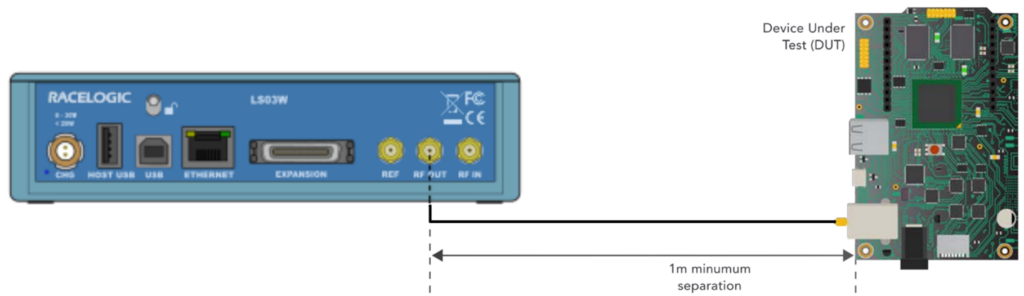
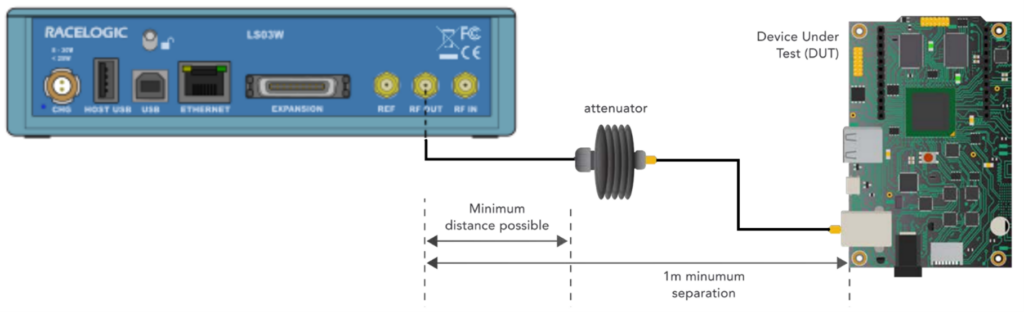
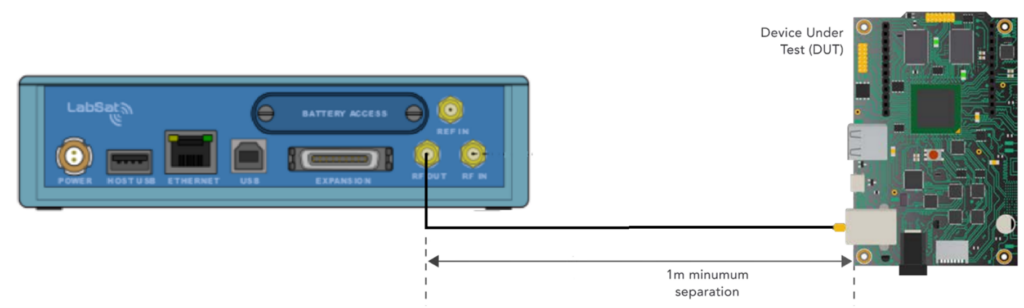
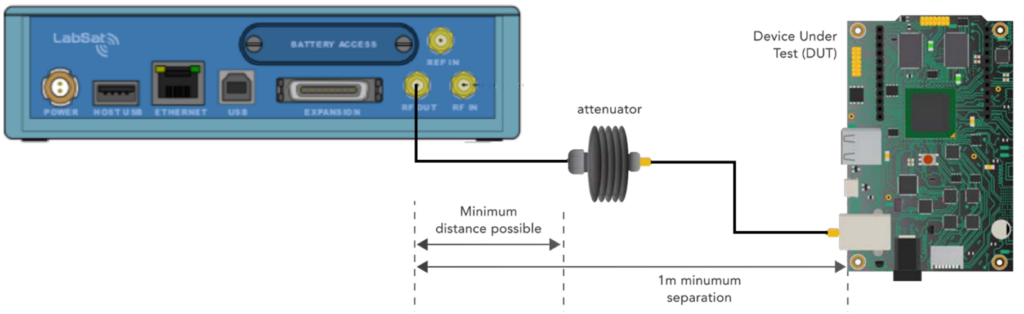
Connect from the LabSat RF OUT port to the DUT antenna connector/RF IN. (If an attenuator is required place this inline between the LabSat and DUT).
Step 2)
Using the up and down arrows on the LabSat front panel, highlight the scenario desired for replay.
Step 3)
Press the ‘play’ button to start the scenario replay.
Step 4)
Power up the receiver and complete the cold, warm or hot start dependent on your test requirements.
Step 5)
Use the DUT’s software, if available, or NMEA output to monitor for initial GNSS lock. Connection Diagrams
Connection Diagrams
LabSat 3
LabSat 3 Wideband