Which LabSat should I use?
We recommend using LabSat 3 or LabSat 3 Wideband when testing with CAN Data. The GNSS capabilities of the device under test (DUT) will determine which model is most suited.
If your DUT supports signals outside of the L1 frequency band, for example GPS L5, then LabSat 3 Wideband is the model required.
If your DUT only operates within the L1 frequency band, we recommend LabSat 3 for this test.
Overview
LabSat 3 & LabSat 3 Wideband are capable of listening to, and recording data from, two separate CAN networks. Dual channel CAN Bus data recording can be achieved in two ways. Depending on the mode selected, the CAN signal will be either digitized and re-created on a raw bit level or decoded and recorded in a time-stamped text file. The CAN mode operation is selected under the menu option ‘CAN’ in the SETUP section. When ‘digitized’ mode is selected, the channel is configured in the ‘Digital’ menu.
DIGITIZE mode
The ‘Digitize’ mode records CAN data by listening to the bus and sampling the rising and falling edges of the raw signal. Timing codes are inserted into the recorded GPS data so that when the file is replayed LabSat re-creates the digitized CAN signal exactly as it appeared during recording. This mode can therefore be used to capture data along with bus-errors or data-collisions and is synchronised to the RF signal to within approximately 60 nanoseconds. One advantage of this mode is that there is no-need to configure CAN baud rate. During replay, the CAN data can be viewed with a CAN Bus analyser tool such as Vehicle-SPY or CANAlyzer.
When using the digitize method the CAN data is replayed exactly as recorded, there will be no arbitration with other systems during replay. Therefore, if the CAN data is replayed into a system which is transmitting its own CAN data, LabSat will ‘speak’ over the top of the other CAN data. This may cause corruption of some data frames. LOG FILE mode
Selecting the ‘LOG FILE’ mode of CAN recording enables data to be recorded in an easy to read text log file as shown below.
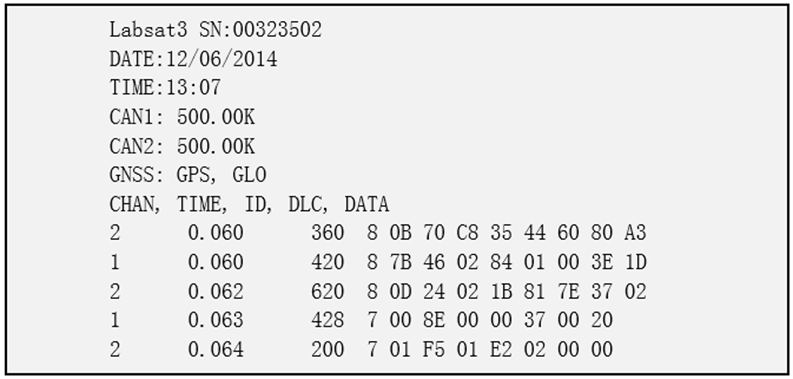
The log file contains a short header detailing the LabSat serial number, time, date CAN Bus baud settings and GNSS settings. Each line of CAN data recorded contains the following space-delimited information:-
- CHAN – CAN Channel that the data was received on 1 or 2.
- TIME – Timestamp to 1 ms resolution.
- ID – Identifier, ‘x’ suffix is shown for extended CAN IDs.
- DLC – Data length code DLC, this shows the number of data bytes within the CAN frame.
- DATA – Data section, up to 8 bytes of data as indicated by the DLC.
At the end of the log file there will be a summary of the number of CAN messages received on each channel during the recording.
The log file is recorded in the same folder as the RF data and has a .TXT file extension. During recording, the CAN controller listens to the CAN bus and stores incoming data. LabSat will transmit acknowledge pulses on the bus in response to correctly received data unless the ‘Silent Record’ option is ticked. The ability to transmit acknowledge pulses in ‘LOG FILE’ mode means that it is possible to record data directly from inertial sensors or other devices with a CAN bus output.
During the replay of data recorded in the ‘LOG FILE’ mode, LabSat scans through the log file, sending the CAN data at the time intervals indicated by the time-stamp. Because CAN data is transmitted using an active CAN Bus controller, LabSat will arbitrate by listening to the current bus state and only transmitting the data between other messages that may be sent from other nodes.
Test Process
LabSat 3 – Log File mode
Recording
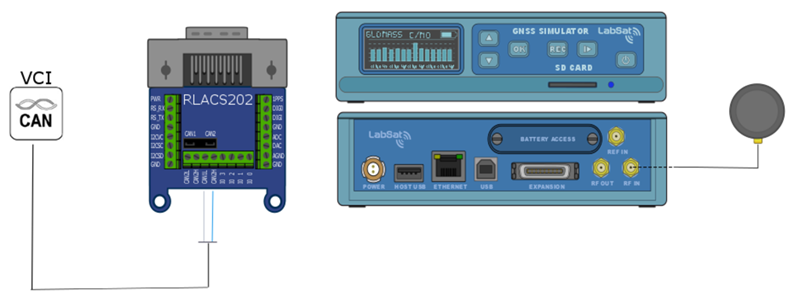
- Connect the ‘CAN1 High’ and ‘CAN1 Low’ ports of the expansion connector to the appropriate wires/cable.
- Connect the LabSat 3 antenna (RLACS198) to the ‘RF IN’ port.
- Power up the LabSat 3 and navigate to the ‘CAN’ section of the menu. Set the CAN recording type to ‘Log file’ and set the baud rate for both CAN channels.
- Fit the expansion connector to the LabSat.
- Pressing the ‘REC’ button on the front of the LabSat will begin the recording. The LabSat will record all CAN data available on the connected Bus.

Replaying
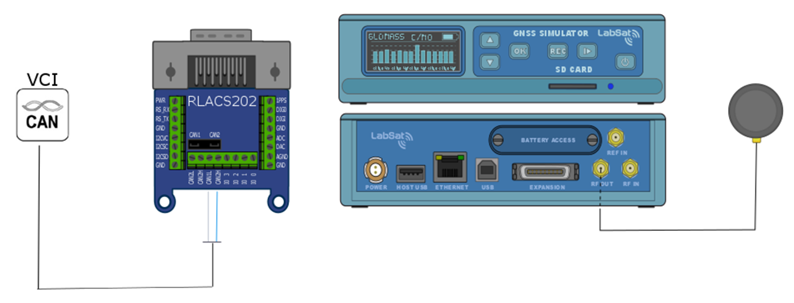
- Connect the ‘CAN1 High’ and ‘CAN1 Low’ ports of the expansion connector to the appropriate wires/cable.
- Connect the device under test to the LabSat 3 ‘RF OUT’ port.
- Power up the LabSat 3 and select the previously recorded CAN scenario.
- Fit the expansion connector to the LabSat.
- Pressing the ‘Play’ button on the front of the LabSat will begin the replay. The LabSat will replay all CAN data originally recorded.

LabSat 3 – Digitize mode
Recording
- Connect the ‘CAN1 High’ and ‘CAN1 Low’ ports of the expansion connector to the appropriate wires/cable.
- Connect the LabSat 3 antenna (RLACS198) to the ‘RF IN’ port.
- Power up the LabSat 3 and navigate to the ‘Digital’ section of the menu. Select the ‘CAN’ option.
- Fit the expansion connector to the LabSat.
- Pressing the ‘REC’ button on the front of the LabSat will begin the recording. The LabSat will record all CAN data available on the connected Bus.
Replaying
- Connect the ‘CAN1 High’ and ‘CAN1 Low’ ports of the expansion connector to the appropriate wires/cable.
- Connect the device under test to the LabSat 3 ‘RF OUT’ port.
- Power up the LabSat 3 and select the previously recorded CAN scenario.
- Fit the expansion connector to the LabSat.
- Pressing the ‘Play’ button on the front of the LabSat will begin the replay. The LabSat will replay all CAN data originally recorded.
LabSat 3 Wideband – Log File mode
Record
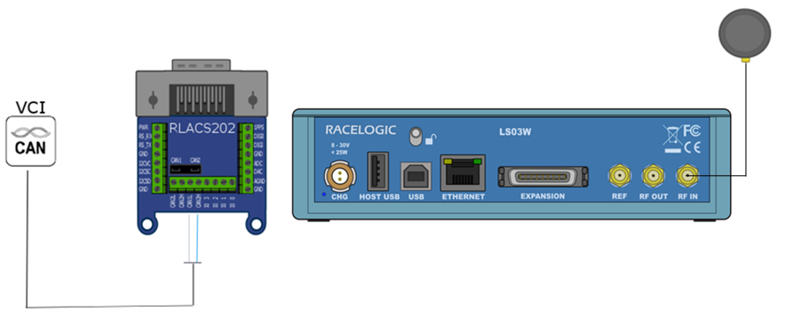
- Connect the ‘CAN1 High’ and ‘CAN1 Low’ ports of the expansion connector to the appropriate wires/cable.
- Connect the LabSat 3 Wideband antenna (RLACS249) to the ‘RF IN’ port.
- Power up the LabSat 3 Wideband and navigate to the ‘CAN’ section of the menu. Ensure the ‘Log file’ option is selected and set the baud rate for both CAN channels.
- Fit the expansion connector to the LabSat.
- Pressing the ‘REC’ button on the front of the LabSat will begin the recording. The LabSat will record all CAN data available on the connected Bus.

Replay
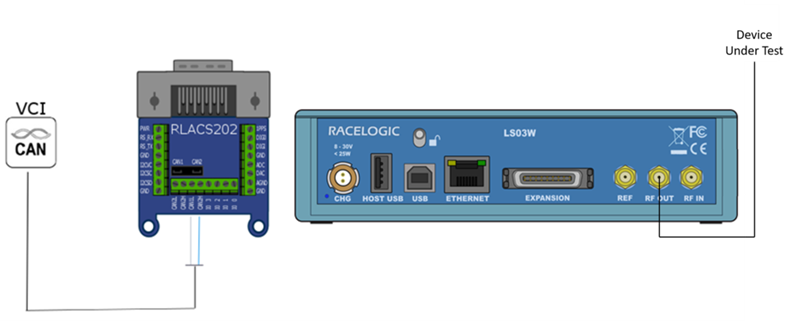
- Connect the ‘CAN1 High’ and ‘CAN1 Low’ ports of the expansion connector to the appropriate wires/cable.
- Connect the device under test to the LabSat 3 Wideband ‘RF OUT’ port.
- Fit the expansion connector to the LabSat.
- Power up the LabSat 3 Wideband and navigate to the ‘CAN’ section of the menu. Ensure the ‘Replay Log file’ option is selected.
- Highlight the scenario, pressing the ‘Play’ button on the front of the LabSat will begin the replay. The LabSat will replay all CAN data originally recorded.
LabSat 3 Wideband – Digitize mode
Record
- Connect the ‘CAN1 High’ and ‘CAN1 Low’ ports of the expansion connector to the appropriate wires/cable.
- Connect the LabSat 3 Wideband antenna (RLACS249) to the ‘RF IN’ port.
- Fit the expansion connector to the LabSat.
- Power up the LabSat 3 Wideband and navigate to the ‘Digital’ section of the menu. Select the ‘CAN’ option.
- Pressing the ‘REC’ button on the front of the LabSat will begin the recording. The LabSat will record all CAN data available on the connected Bus.
Replay
- Connect the ‘CAN1 High’ and ‘CAN1 Low’ ports of the expansion connector to the appropriate wires/cable.
- Connect the device under test to the LabSat 3 Wideband ‘RF OUT’ port.
- Fit the expansion connector to the LabSat.
- Power up the LabSat 3 Wideband and select the previously recorded CAN scenario.
Pressing the ‘Play’ button on the front of the LabSat will begin the replay. The LabSat will replay all CAN data originally recorded.
